Configure 802.1x Network Authentication Microsoft Teams Rooms on Windows
When connecting a Microsoft Teams Rooms on Windows (MTR-W) device to an enterprise network, additional configurations may be required to enable authentication for both wired and wireless connections. This guide walks through how to configure MTR-W devices to authenticate with networks requiring 802.1X authentication.
- Understanding 802.1x Network Authentication
- Section 1: Configure Network Settings for Machine-based Authentication
- Section B: Install Certificates on Teams Rooms on Windows
- Use Local Machine Certificate Store
- Method 1: Administrator Desktop
- Method 2: Group Policy
- Method 3: PowerShell
- Running PowerShell Scripts Remotely
- Method 4: Deploying Certificates with Intune
- Prerequisites
- Deploying Certificates using SCEP
- Deploying Certificates using PKCS
- Method 5: Provisioning Package
- Install Provisioning Package
Understanding 802.1x Network Authentication
802.1x network authentication is a security protocol used in enterprise environments to control access to wired and wireless networks. It requires devices to authenticate before connecting, ensuring that only authorized users and machines can access network resources. This authentication process typically involves the Extensible Authentication Protocol (EAP) and a RADIUS server.
Which Network Authentication Mode for MTR-W?
When connecting to an 802.1x network, it’s important to understand the authentication methods available and which should be used for Microsoft Teams Rooms on Windows (MTR-W) machines.
User-based Authentication
This method leverages the user account signed into Windows to authenticate with the Wi-Fi network. This way network access is granted based on individual user credentials, providing a secure connection for each user.
Machine-based Authentication
This method uses device credentials for network access. This can be particularly useful for devices that need to maintain network connectivity even when no user is logged in, such as kiosks, servers, or IoT devices. Machine-based authentication ensures that the device itself is authenticated, and this is the method that should be used for Microsoft Teams Rooms on Windows devices.
Note: For more information on why machine-based authentication is needed for MTR-W refer to Network Authentication Methods for Microsoft Teams Rooms on Windows.
Configure Network Settings for Machine-based Authentication
To set up machine-based network authentication on a Microsoft Teams Rooms on Windows (MTR-W) device, two key components are required: a network profile and a certificate. The following sections will provide detailed guidance on each component. In Section 1, we will cover what a network profile is and how to install it on a device. Section 2 will delve into the role of certificates.
Section 1: Configure Network Settings for Machine-based Authentication
To enable a Windows machine to connect to an 802.1x network, it must be configured with the appropriate network settings. While there are several ways to do this, in the first part of this section we’ll focus on how to configure the system using a network profile.
Network Profile
A Windows network profile is an XML configuration file that enables Windows devices to automatically connect to a specified network based on the file’s configuration. Network profiles need to follow the appropriate XML schema, and can either be created from scratch or exported from an already configured machine.
Export Network Profile from Configured Machine
To export the XML profile, you need a Windows machine already configured to authenticate with the 802.1x network you want the profile for. While on this machine execute the following command as an administrator:
Export wireless network profiles
netsh wlan export profile folder=C:\Export wired network profiles
netsh lan export profile folder=C:\Navigate to the output directory you specified in the command and locate the XML network profile, and copy it to a safe location.
Confirm machine-based authentication is configured in profile
Open the XML network profile and confirm its set to use “machine”. If any other authentication mode is configured, Windows will default to user-based authentication, which is not recommended for Teams Rooms on Windows devices. Here are the different authentication modes that can be set:
- Not configured: By default, User or machine authentication is used.
- User: The user account signed in to the device authenticates to the network.
- Machine: Device credentials authenticate to the network.
- User or machine: When a user is signed in to the device, user credentials authenticate to the network. When no users are signed in, then device credentials authenticate.
Import network profile on Teams Rooms on Windows
Once we have our network’s profile, there are a number of different ways it can be imported onto a Teams Rooms on Windows system.
Method 1: Command prompt
Copy the XML network profile to the machine you want to import it to, then open a command prompt and run the following command. Ensure the filename argument points to the location of the XML file.
Import wireless profile
netsh wlan add profile filename="YourNetworkProfile.xml" user=allImport wired profile
netsh lan add profile filename="YourNetworkProfile.xml" user=allMethod 2: Microsoft Intune
Intune can be used to deploy XML network profiles to Windows machines using the following custom OMA-URIs.
Wireless network CSP: ./Device/Vendor/MSFT/WiFi/Profile/{SSID}/WlanXml
Wired network CSP: ./Device/Vendor/MSFT/WiredNetwork/LanXML
Note: When deploying policies with Intune, the device must have internet access to communicate with Intune so it can sync the policy containing the network profile. For this purpose, you may need to temporarily connect the device to an open network.
Method 3: Provisioning Package
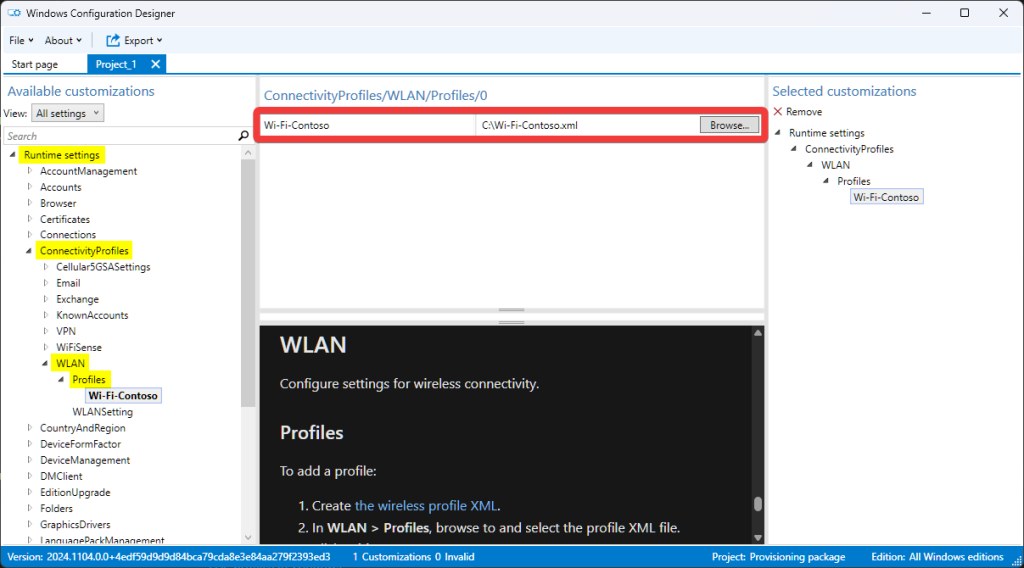
A provisioning package is a configuration file that can be used to quickly set up and configure new Windows devices during or after the out-of-box-experience (OOBE). To install a wireless network profile using a package, you’ll need to add the XML network profile to the below runtime setting. Then build the package and install it on the Teams Rooms on Windows device.
Runtime settings > ConnectivityProfiles > WLAN > Profiles > Browse
Using Intune to Configure Network Settings
Configuring network settings on Windows devices using Microsoft Intune offers an alternative way to deploying XML network profiles. Within Intune, you can create an 802.1x network profile that caters to both wireless and wired network configurations.
Before creating a network profile within Intune I’d recommend looking over the following resources for detailed information on configuring enterprise network profiles and additional network settings:
Wireless Network
- Wi-Fi CSP: Comprehensive guide to Wi-Fi Configuration Service Provider (CSP) settings.
- Wi-Fi settings for Windows in Intune: Instructions on configuring Wi-Fi settings for Windows devices using Intune.
Wired Network
- Wired network CSP: Guide to Wired Network Configuration Service Provider (CSP) settings.
- Wired network settings for Windows in Intune: Detailed instructions on configuring wired network settings for Windows devices in Intune.
Creating Enterprise Network Profiles within Intune
Follow the steps below to create and configure an enterprise network profile in Intune.
- Sign into the Microsoft Intune admin center
- Select Devices > Manage devices > Configuration > Create > New policy
- Select Windows 10 or later
- Select Wi-Fi or Wired network
- Configure the enterprise profile to with your network settings and requirements.
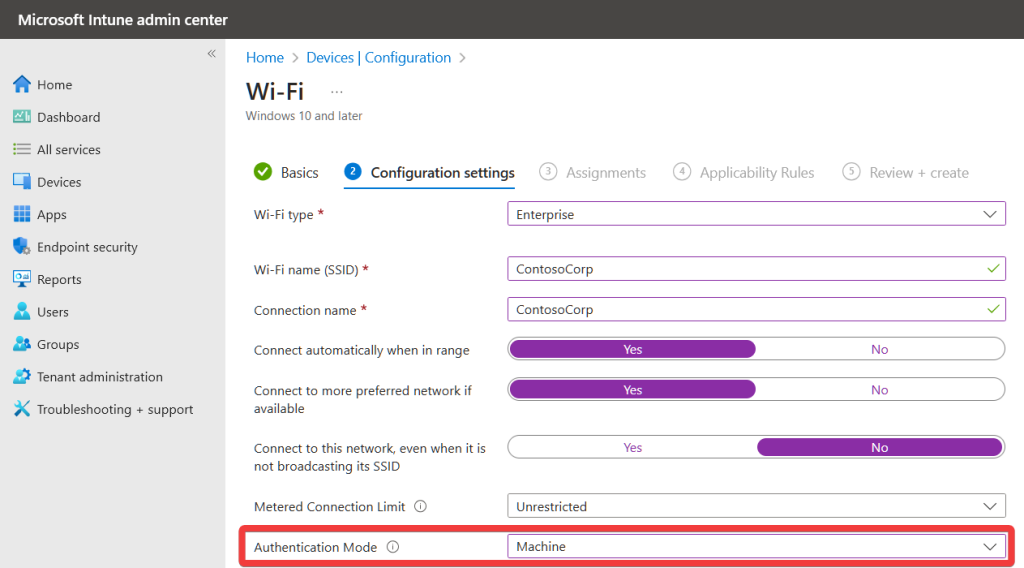
Note: Ensure “Machine” authentication is selected for Teams Rooms on Windows devices, as explained in this article.
Section B: Install Certificates on Teams Rooms on Windows
Certificates play a crucial role in 802.1X network authentication by providing a secure method for verifying the identity of devices attempting to connect to the network. During the authentication process, certificates are used to establish a trusted relationship between the client device and the network infrastructure, ensuring that only authorized devices can access network resources.
Use Local Machine Certificate Store
When installing certificates on a Microsoft Teams Rooms on Windows device, ensure you are adding them to the local machine certificate store, not the user store. The machine store is accessible to all users, including the local Skype user account MTR-W uses to launch the Teams Rooms end-user experience.
Method 1: Administrator Desktop
Administrators can manually install certificates on an MTR-W device through the administrator desktop. Although this approach may not be scalable for deployments, it offers a straightforward way to test certificate validity with network authentication.
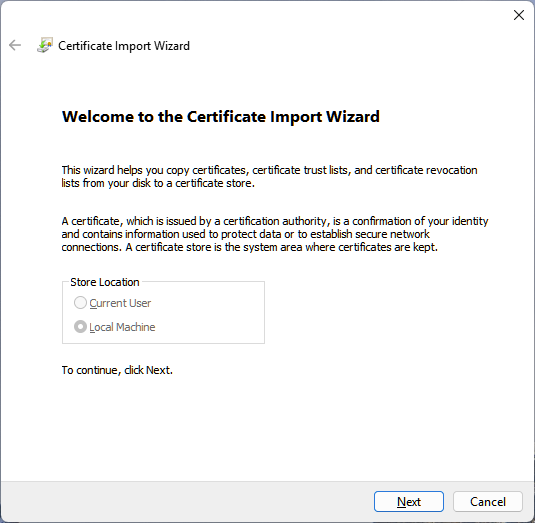
Open the Microsoft Management Console (MMC), add the Certificates snap-in for the local computer, then use the Certificate Import Wizard to import the certificate into the desired store. Ensure the import is successful and the certificate is visible in the chosen store.
Method 2: Group Policy
Certificates can be deployed using Group Policy in an Active Directory environment. This method is useful for managing certificates across multiple devices within an organization. For detailed steps on configuring this reference distribute certificates to Windows devices by using Group Policy.
Method 3: PowerShell
PowerShell can be used to install certificates on a Windows machine by utilizing the Import-Certificate cmdlet. This cmdlet allows you to import a certificate file into a specified certificate store.
Here’s an example script that can be used to install a certificate locally on a device:
$certPath = "C:\path\to\your\certificate.cer"
$storePath = "Cert:\LocalMachine\My"
Import-Certificate -FilePath $certPath -CertStoreLocation $storePath
Running PowerShell Scripts Remotely
To run PowerShell scripts on remote computers, you can use the Invoke-Command cmdlet. This cmdlet allows you to execute scripts on one or more remote computers. First, ensure that PowerShell remoting is enabled on the remote computer:
Enable-PSRemotingThen, use Invoke-Command to run your script on the remote computer:
$scriptBlock = {
    $certPath = "C:\path\to\your\certificate.cer"
    $storePath = "Cert:\LocalMachine\My"
    Import-Certificate -FilePath $certPath -CertStoreLocation $storePath
}
Invoke-Command -ComputerName "RemoteComputerName" -ScriptBlock $scriptBlock
For more information on running remote commands, refer to the Microsoft documentation.
Method 4: Deploying Certificates with Intune
Microsoft Intune provides a streamlined approach for deploying certificates to Windows devices. Intune supports various certificate deployment methods, including Simple Certificate Enrollment Protocol (SCEP) and Public Key Cryptography Standards (PKCS).
For more information on using and deploying certificates with Intune, refer to Microsoft’s documentation on using certificates.
Prerequisites
Before deploying certificates using Intune, ensure you’ve imported the Trusted Root Certificate Authority (CA) certificate onto the device. This establishes a trust relationship between the device and the issuing CA.
Deploying Certificates using SCEP
Simple Certificate Enrollment Protocol (SCEP) is designed to simplify the issuance and management of digital certificates, automating the process for large-scale deployments. For more detailed information, you can refer to the Intune SCEP documentation.
Follow these high-level steps to deploy certificates using SCEP:
- Configure your Certification Authority (CA) and Network Device Enrollment Service (NDES).
- Create and configure a SCEP certificate profile in Intune.
- Assign the profile to the necessary user or device groups.
- Deploy a trusted root certificate profile.
Deploying Certificates using PKCS
Public Key Cryptography Standards (PKCS) provide a set of protocols for managing and deploying digital certificates, offering flexibility for both manual and automated enrollment. For more detailed information, you can refer to the Intune PKCS documentation.
Follow these high-level steps to deploy certificates using PKCS:
- Create and configure a PKCS certificate profile in Intune.
- Assign the profile to the appropriate user or device groups.
- Deploy a trusted root certificate profile.
Method 5: Provisioning Package
A provisioning package is a configuration file that can be used to quickly set up and configure Windows devices with specific settings and applications, including certificates.
Packages are created using a tool called Windows Configuration Designer. When creating the provisioning package use the RootCertificates and CACertificate runtime settings to install certificates to the local machine store.
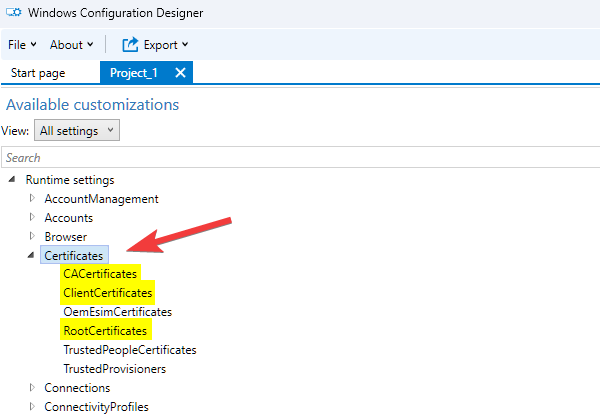
After adding the certificates to the package, click Export at the top and then Provisioning package. Follow the remaining prompts to build the package. Reference the below table to understand where to place each type of certificate within the package.
| Certificate Type | Provisioning Package Location | Device Store |
| Root Certificate | RootCertificates | Machine store |
| Intermediate Certificate | CACertificates | Machine store |
| Client Certificate | ClientCertificates | Personal store |
Install Provisioning Package
To install a provisioning package on a Teams Rooms on Windows machine simply double-click on the .ppkg file. Alternatively, you can install packages using PowerShell with the Install-ProvisioningPackage cmdlet.
Conclusion
Configuring 802.1x network authentication for Microsoft Teams Rooms on Windows (MTR-W) devices is essential for secure network access in enterprise environments. This guide covered some of the key steps needed to configure network settings, install certificates, while utilizing various deployment methods such as manual installation, Group Policy, PowerShell, Intune, and provisioning packages. For additional information about each of the topics refer to the Microsoft documentation linked throughout the article.